
This past weekend, I came across a blog posting by Tom Harrington of Atomic Bird that talked about how he created a Passbook business card in preparation for heading to WWDC this week. Inspired by his creativity, and missing out on not being at WWDC this year after having been there past three years, I set out to create my own Passbook business card. Here’s a step by step of how I did it. You can reference Apple’s Developer documentation on Passbook for more information as well.
1. Create a Passbook Pass Type ID and Signing Certificate
In order to create a Pass that can be loaded into Passbook, you’ll need to properly sign the pass using a certificate/key pair that you generate with your developer account. Head over to the developer account and navigate into the “Certificates, Identifiers & Profiles” area.
First, we have to create a Pass Type ID that the certificate will be tied to for signing passes. Navigate to the “Identifiers” area and choose “Pass Type IDs” in the menu on the left.

Click to add a new Pass Type ID. Fill in a friendly name for the Pass Type and then specify a reverse domain style identifier string for your pass type. This is very similar to App IDs just with a “pass.” pre-pended at the beginning. For example, I used “pass.com.technomagination.businesscard”.
Once you’ve created the Pass Type ID, you’re ready to create the certificate. Navigate to the “Certificates” section in the portal and click to add a new certificate. The wizard with present you will a series of options for the type of certificate that you want to create. Under Production, choose “Pass Type ID Certificate.” You will then be presented with the Pass Type ID that you created. Choose that and continue. Apple will then walk you through the normal CSR, key and certificate creation process to create the certificate using KeyChain. Download the certificate locally once you’ve created it.
2. Prepare assets (logo, thumbnail, icon) for your pass
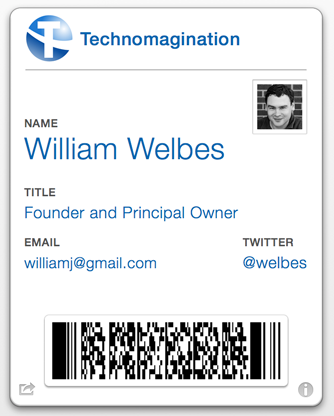
You can add images to your pass for your logo, a thumbnail and a pass icon. If you use a generic style pass, the logo is in the upper left, the thumbnail is on the right, and the icon is shown if your pass appears in a notification.
Start by creating a directory for your pass package contents with a .pass extension. You’ll place your images and pass.json file in this directory. Here’s the structure of the pass package as defined by Apple. (Note: The en.lproj, etc. is not necessary unless you are going to be using other language versions of your pass)
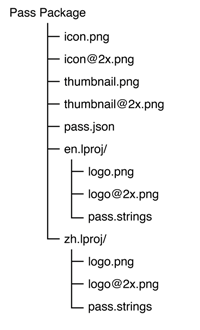
Prepare the logo, thumbnail and icon PNG images and place them in your pass directory. You should have both a 1x and 2x size PNG for each and use the naming convention specified by Apple:
- logo.png: max points is 160pt x 50pt. I used a 50pt by 50pt image (with a 100 by 100 @2x image)
- thumbnail.png: the allotted space for the thumbnail is 90pt by 90pt.
- icon.png: use a 29px by 29px and 58px by 58px @2x icon files
You can view some sample passes from Apple’s companion file the is posted with the Passbook Programming Guide.
3. Create a pass.json file to define your pass
Apple’s Developer Documentation defines the design and structure for Passbook passes. I used the “generic pass” layout. You can customize the colors, images and fields using the Passbook pass JSON file and assets. There are some important fields to include in your pass:
- passTypeIdentifier : The reverse domain style string that you defined for the pass type ID in the developer portal. This needs to match so that your pass can be properly signed and packaged.
- serialNumber: Any number that uniquely identifies your pass.
- teamIdentifier: This is your Apple Developer Program Team Identifier. You can find that in the Developer Program portal under the “Member Center” area.
I also chose to include a barcode in my pass to make is super easy to allow someone else to scan my pass from Passbook and download it directly. It’s worth noting that the pkpass file that you generate at the end must be at a https URL and the Content-Type for the HTTP header should be set to: application/vnd.apple.pkpass
Here’s the contents of the pass.json file that I created for my Passbook business card:
{
  "formatVersion" : 1,
  "passTypeIdentifier" : "pass.com.your-organization.your-appname",
  "serialNumber" : "0",
  "teamIdentifier" : "YOUR_TEAM_ID_FROM_DEVELOPER_PORTAL",
  "barcode" : {
    "message" : "https://welbes-shared.s3.amazonaws.com/williamwelbes.pkpass",
    "format" : "PKBarcodeFormatPDF417",
    "messageEncoding" : "iso-8859-1"
  },
  "organizationName" : "Technomagination",
  "description" : "William Welbes's Card",
  "logoText" : "Technomagination",
  "foregroundColor" : "rgb(9, 80, 160)",
  "backgroundColor" : "rgb(255, 255, 255)",
  "generic" : {
    "primaryFields" : [
      {
        "key" : "name",
        "label" : "NAME",
        "value" : "William Welbes"
      }
    ],
    "secondaryFields" : [
      {
        "key" : "title",
        "label" : "TITLE",
        "value" : "Founder and Principal Owner"
      }
    ],
    "auxiliaryFields" : [
      {
        "key" : "email",
        "label" : "EMAIL",
        "value" : "williamj@gmail.com"
      },
      {
        "key" : "twitter",
        "label" : "TWITTER",
        "value" : "@welbes"
      }
    ],
    "backFields" : [
      {
        "label" : "NAME",
        "key" : "nameBack",
        "value" : "William Welbes of Technomagination"
      },
      {
        "label" : "EMAIL",
        "key" : "emailBack",
        "value" : "williamj@gmail.com"
      },
      {
        "label" : "TWITTER",
        "key" : "twitterBack",
        "value" : "http://www.twitter.com/@welbes",
      },
      {
        "label" : "GITHUB",
        "key" : "githubBack",
        "value" : "http://www.github.com/welbesw",
      },
      {
        "label" : "WEB",
        "key" : "webBack",
        "value" : "http://www.technomagination.com"
      }
    ]
  }
}
4. Sign and package your pass
Once you’ve got your pass package directory all setup, all you need to do to create your pass is sign and package it using a tool that Apple provides the source code to. The companion file that Apple posted contains a project called “SignPass” that you will need to build using Xcode. Once you build the project, put the output signpass executable somewhere that you can run it from within your path in terminal.
Open terminal and navigate to the directory that contains your pass package directory. Run the signpass command to sign and build the package using your package contents and signing certificate.
signpass -p yourdirectoryname.pass
Once you have successfully built the package, you’ll see a file with .pkpass in your directory now.
5. Test and distribute your pass
Ok. So now you have a .pkpass file. How do you test it out?
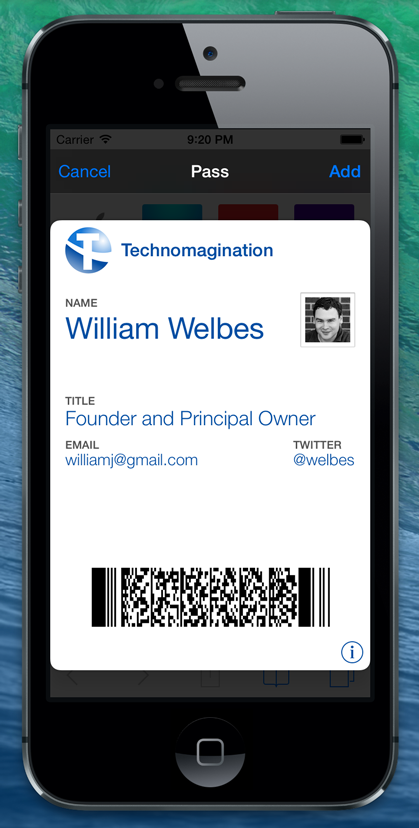
An easy way to test it on OSX is to simply load it into the iOS Simulator. Load up the simulator and then just drag and drop the .pkpass file on to the simulator. That’s it! If everything worked correctly, you should be prompted on the simulator to download and install your pass. If the simulator throws an error, you can open up the simulator’s log from the Debug menu and see what error is being reported by the Passbook app.
Once you’ve got a working pass, you can distribute via the web. I posted my pass to an Amazon S3 bucket. As I indicated earlier, you must use an HTTPS url for the bar code URL and in order to use HTTPS on Amazon S3, your bucket name cannot have dots in it. Apparently that’s a limitation of S3 and HTTPS. Don’t forget to the set the Content-Type in S3 to application/vnd.apple.pkpass.
If you have your barcode setup, when you want to share your card with someone, simply load up your card in Passbook and have them open up Passbook and tap “Scan Code” to scan your bar code. Grin and move on :)
Happy passbooking!
For extra credit, you could do something with iBeacon like Tom Harrington is and broadcast an iBeacon as you walk around so that you would pop up notifications for folks around you with your business card. A real Nerd Alert!